"News YOU can USE" Posted January 28, 2010
Can't view your lessons? Can't place a file in the dropbox?
Turn on your speakers and view this video and find some helpful hints!
Thursday, January 28, 2010

Tuesday, January 26, 2010
Week 4, Keyboarding
Congratulations! You have now mastered the alphabetic keys on the keyboard! Of course, you may want to go back and practice the last few lessons because your timed writing Module 1 Exam is due by Monday. Another reminder, you have an Oral Test this week! More details later in the BLOG! And look for some BONUS POINTS IN THE BLOG!
Keyboarding Techniques
Are you confident that your techniques are helping you type faster and more accurately. Here is a quick review of some techniques for you.

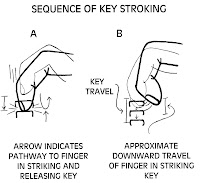


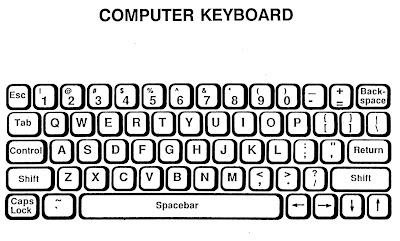
Module 1 Oral Test.
That means you have to call me at 601.810.4923 and we will discuss keyboarding techniques, keyboarding tips, and also Netiquette issues. Please text me or page me through the course to make an appointment for the test. My number is 601.810.4923. Of course, PLEASE DO NOT WAIT until Monday to do this. You have 39 classmates and I want to give each of you equal time.
 601.810.4923
Timed Writing Instructions


After you have completed your test that you wish to submit, please follow these directions carefully.

Netiquette Discussion
Be sure to read Seth Ross' rules of etiquette. (http://www.albion.com/netiquette/corerules.html) Select an adult with whom you can discuss the rules. Together decide which 3 are the most important rules and why. In the discussion forum give the name of the person with whom you discussed netiquette; list the 3 rules you selected. Tell why you chose each rule and why each one is important. Each rule should be supported with 2-3 sentences each. You must use proper grammar, capitalization, and punctuation. (Two spaces after the end of each sentence!)Keyboarding Techniques
Are you confident that your techniques are helping you type faster and more accurately. Here is a quick review of some techniques for you.


Module 1 Oral Test.
That means you have to call me at 601.810.4923 and we will discuss keyboarding techniques, keyboarding tips, and also Netiquette issues. Please text me or page me through the course to make an appointment for the test. My number is 601.810.4923. Of course, PLEASE DO NOT WAIT until Monday to do this. You have 39 classmates and I want to give each of you equal time.
 601.810.4923
Timed Writing: READ THIS DOCUMENT CAREFULLY!!!!!
Exam 1 Part B: Timed Writing Instructions
Print this document so you can check off each item as you complete it.
You will now complete the exam in MicroType 4.2. This will be a timed writing. You will have one minute to type as much of the sample text as quickly and accurately as you can. Remember, your goal is to have fewer than three errors. It is better to go a little slower and make fewer errors than go too fast and make too many mistakes.
You may want to do the Quick Review sections in MicroType 4.2 to practice and warm up before taking this exam.
Important Tips: You will find some great tips (below) that you should read before beginning to type your timed writing. Be sure to read all of this page before you begin to type.
Timed Writing Instructions
Open the Microtype 4.2 program and login
- On the main screen, Click. Timed Writing (clock face) located in the green section on the left side of the screen. Select Writing 1 for one minute.
- Make sure Writing01 is highlighted. The Timing Link should be set to 1 minute.
- In the Timing Options Display timer should be checked.
- You should uncheck the Beep every 15 seconds option.
- Then click the OK button.
- Pressing OK will give you the Timed Writing Dialog box. It should look similar to the box displayed below. Your text to be keyed will appear in blue in the dialog box above the typing box.
- Read the message window that pops up and then click the OK button. Please do not tap the ESC key but continue to type until your time is completed.
VERY IMPORTANT:
- When you press a key on your keyboard, the clock timer will begin, so please do not press any keys until you have read this entire document.
- When you are ready, position yourself in the correct typing position, press the Tab key to indent, and begin to type the text from the dialog box at the top of the screen.
- Continue typing at a steady pace until the minute is up.
- You must type the timed writing twice. Your work will be saved automatically.
Important Timed Writing Tips
REMINDERS on Timed Writings:- The timer starts the minute you hit a key.
- Do not begin until you are ready. Minimize distractions as much as possible so you can perform at your very best.
- It has always been standard practice in keyboarding to use two spaces after the end-of-sentence punctuation (periods, questions marks, exclamation marks) and colons (:). Not keying two spaces at the end of a sentence will count as an error each time you make this mistake.
- Use the TAB key to indent paragraphs. Using the space bar will count as multiple errors.
- Press the ENTER key only at the end of a paragraph. Microtype will display this symbol 8 to indicate that Enter should be pressed. (Do not press the ENTER key at the end of a printed line.
- If you are an experienced typist you may finish the document before the timer stops. If this happens, do not stop the software will return to the beginning of the document and you should continue typing.
- Your goal is to key at least 9 gwam (gross words a minute) with three or fewer errors. (To receive an "A" on this assignment, you need to key at least 15 gwam.
- If you did not meet your goal, simply complete the Quick Review in MicroType and then retake the timing. You may retake the timing as many times as you like before you submit it to your teacher
How to Submit Your Test
After you have completed your test that you wish to submit, please follow these directions carefully.
1. Return to the main screen and access the Report menu as shown in the diagram.
2. Select Timed Writings from the dropdown menu.
3. When you access the Timed Writing Report, the first screen is a summary screen of the timed writings taken.
4. Scroll down the page until the writing summary that is to be submitted is visible. Your name, date, Writing 01 and both first and second attempt information must be visible on the screen. Click Print Screen to capture the image of your results.
5. Open the Word Processing Program; paste your test results screen (Ctrl+V). Save the file as xxexam_1 (replace xx with your initials) and submit it to the dropbox.

NOW FOR THE GOOD STUFF:
BONUS POINTS
Did you sign up as a follower on this BLOG? (See Welcome to Keyboarding for instructions.)
For 9 Bonus Points this week, add a comment to the bottom of this post (under comments, using your sign-in for the Blog (usually your email).
- Write a sentence to tell what you liked most about this module
- Write another sentence to tell what you liked least.
- Add a sentence about how you would change this module if you had the chance.
Tuesday, January 12, 2010
Week 2, Keyboarding
What a week for you--snow, ice, schools closed--but most of you still managed to get some work done in your online class. Thanks for getting through all that Orientation material. You earned some great bonus points. And it's not too late for the rest of you. You can complete the Orientation module through this week. After that, it's too late to earn those Bonus points.

Keyboarding FAQs (Frequently Asked Questions)
Q--How do I install MicroType 4.2 on my computer?
A--See Class BLOG for Week 1. Also see Course Information, Module 1.
Q--Why do I need a class folder?
A--So you can easily find your work to submit to the dropbox.
.
Q--How do I create a folder?
A--See Class Blog for Week 1. Also see Course Information, Module 1.
Q--How do I turn in assignments to the dropbox?
A--See Class BLOG for Week 1. Also see Course Information, Module 1.
Q--How can I check my grades?
A--Check my Progress on the Home Page.
Q--What is that green button on the upper right side of the Home Page?
A--It's the pager; click on it to make or receive instant pages from me and the class.
Q--What is that noise that I hear when I sign in to the course Home Page?
A--It's the instant messaging pager. See answer above.
Q--How can I see what I made on dropboxes?
A--Check "updates" on the course home page; Go to the Dropbox and read Comments.
Q--When are assignments due?
A--Assignments are made each Tuesday; they are due the following Monday by 6 pm.
Q--What happens if my Computer crashes?
A--Get a flash drive (aka "thumb drive") first thing tomorrow and back up your files daily.
Keyboarding Rules
(You are responsible for each of the following rules and others that will be added in the future. Please use these rules in all dropbox and discussion posts. Points will be deducted for infractions.)

Q--How do I install MicroType 4.2 on my computer?
A--See Class BLOG for Week 1. Also see Course Information, Module 1.
Q--Why do I need a class folder?
A--So you can easily find your work to submit to the dropbox.
.
Q--How do I create a folder?
A--See Class Blog for Week 1. Also see Course Information, Module 1.
Q--How do I turn in assignments to the dropbox?
A--See Class BLOG for Week 1. Also see Course Information, Module 1.
Q--How can I check my grades?
A--Check my Progress on the Home Page.
Q--What is that green button on the upper right side of the Home Page?
A--It's the pager; click on it to make or receive instant pages from me and the class.
Q--What is that noise that I hear when I sign in to the course Home Page?
A--It's the instant messaging pager. See answer above.
Q--How can I see what I made on dropboxes?
A--Check "updates" on the course home page; Go to the Dropbox and read Comments.
Q--When are assignments due?
A--Assignments are made each Tuesday; they are due the following Monday by 6 pm.
Q--What happens if my Computer crashes?
A--Get a flash drive (aka "thumb drive") first thing tomorrow and back up your files daily.
Keyboarding Rules
(You are responsible for each of the following rules and others that will be added in the future. Please use these rules in all dropbox and discussion posts. Points will be deducted for infractions.)
- Space once after a comma (,) within a sentence.
- Space twice after punctuation at the end of a sentence before you key another sentence. (Do not space before punctuation.)
- Space twice after a colon (:) within a sentence.
- Do not space after beginning parenthesis; space once after the ending parenthesis, except at the end of a sentence. (example).
- Press Tab to indent a sentence. Do not press space bar to move the text to the right..
- Begin every sentence with a capital letter.
- Capitalize proper names.
- Do not type in all caps.
- Review your work for correctness BEFORE submitting the Enter Key!
- Spell check can check your work, but it can't check your mind. (examples: to, too, two; see, sea.)
- Sit in a comfortable chair with your back against the back of the chair, your feet flat on the floor, your arms relaxed over the home row keys. (asdf jkl;)
- Keep your eyes on the screen--not your fingers--as you key the letters.
- Strike each key with a quick, snap key stroke while keeping home row keys covered.
- Strike the enter key with your right little finger (the ; finger).
- Strike the space bar with a quick, down and in motion with your right thumb.
- Rest after each lesson by standing to stretch and moving your arms and hands in semi-circles.
- Take a screen shot of your class folder and sub folders. Hint: Expand (or double click) your class folder so all sub folders are visible.
- Attach it to an email with the Subject Line of My Folders
- Send the email to me (dannie.mckee@gmail.com) with the Subject: My Folders
Tuesday, December 22, 2009
Welcome to Keyboarding!
Welcome to Keyboarding, Spring 2010!
Our Class Blog is the place where you can get additional help on each week's assignments. This issue is a little long, but there is valuable information in it about our class. Please read the Blog carefully and respond when appropriate. Bonus points are available almost every week. So make sure you get all the points you can!
About the Course
About the Course
Keyboarding provides students the opportunity to master the touch-method key stroking skill for entering alphabetic, numeric, and symbolic information on a keyboard and a ten-key pad. Emphasis is placed on developing proper speed and accuracy techniques. Students will format documents such as letters, memorandums, reports, announcements, and tables for personal, educational, and business uses.
This course is designed to be a one-semester, .5 credit course. You will receive 1/2 Carnegie unit for successful completion of the class. The course contents support the MS Framework for Business and Technology.
This course is designed to be a one-semester, .5 credit course. You will receive 1/2 Carnegie unit for successful completion of the class. The course contents support the MS Framework for Business and Technology.
In your online class, you will complete work with MS Word and MicroType Software (v. 4) You should have received a disk with the MicroType 4.2 software. PLEASE WAIT FOR COMPLETE DIRECTIONS BEFORE YOU INSTALL THE SOFTWARE. If you have not received your disk, please contact your MVPS Site Coordinator at your school. We will discuss this software and the installation in more detail later.
For now, just browse the course pages to get familiar with the assignment locations; explore the tabs on the content page, such as Discussions, Dropbox, Quizzes, Grades, etc. You will use these tabs to "turn in" your work and see the grades that are posted.
Go to the ORIENTATION tab under content and complete the entire section. Update your profile and add a picture also; the first day of class is a GREAT time to do this! Plus you will get bonus points for all orientation work.
For now, just browse the course pages to get familiar with the assignment locations; explore the tabs on the content page, such as Discussions, Dropbox, Quizzes, Grades, etc. You will use these tabs to "turn in" your work and see the grades that are posted.
Go to the ORIENTATION tab under content and complete the entire section. Update your profile and add a picture also; the first day of class is a GREAT time to do this! Plus you will get bonus points for all orientation work.

Assignments
Assignments will be posted on the "News" page every Tuesday and are to be completed by Monday of the following week. Other notes may also be posted there for your review.Check the "News" frequently! That is your source for important information. Also, check your grades on the "Grades Tab" every week--work not completed results in a "0" on the grade tab. Work may be turned in late, but your grades may reflect a lower score.
I also send frequent pages and emails to you. Make it a daily habit to check the "NEWS", the "Pages", and your "EMAILS". If you hear a beep when you are signed in to your course, click the little green page button located in the upper right corner of your screen. It is real-time paging and you can also page others. Respond as required to each item. Failure to do this will reflect in your grade.
SPECIAL NOTE: You are required to have a flash (aka thumb) drive or external hard drive to use as backup for your files. "My computer crashed" is not a valid excuse for not turning in work. Back-up files every time you complete an assignment! Then if you move to another computer or want to work from home, you will have your files.
BLOG NOTES: Other assignments will be posted here on our class Blog. It is your responsibility to check the blog frequently and follow the assignment directions. These assignments will be part of your class grade. Bookmark (or add as a favorite) this BLOG so you can get back to it easily.

Your first assignment from this blog is to join this BLOG as a follower. You can use your email address as your identification. Then add a comment (go to bottom of this BLOG page) that includes your first name and what you expect to learn in this class. (If you have any difficulty doing this, please email or call me right away!)
Other Notes
We have a special Discussion Board on our Class Page--check out Mrs. McKee's Chalk Board. Here you will find our weekly assignments, all our class email in one location, and a place to ask other students for help. Bonus points will be awarded on some of your posts. Just check it every time you log in so you don't miss anything.
We also have a class "Chat" button on your course page. I will schedule chats from time-to-time to allow you to make comments and ask questions in an interactive mode with me and your other classmates. Sometimes these chats will be given Bonus points, depending upon the quality of your participation.
Another cool feature is our "OnLine Rooms" where we can hold a real-time class session. Our first OnLine Room meeting is January 7, 2010 at 7:00 pm Central Time. The online meeting will last about 1 hour. You can ask questions and meet your other classmates during this time. Just remember, the session is recorded so practice good online manners.
Another cool feature is our "OnLine Rooms" where we can hold a real-time class session. Our first OnLine Room meeting is January 7, 2010 at 7:00 pm Central Time. The online meeting will last about 1 hour. You can ask questions and meet your other classmates during this time. Just remember, the session is recorded so practice good online manners.
I Like to Talk on the Phone! You can expect a phone call from me this week to confirm your enrollment in the class. I also like to talk with your parents from time-to-time just to give them a progress report. Your site coordinator also receives frequent calls from me. As for any problems that you encounter such as log-in, course questions, software issues, etc., you may contact me by phone or text at 601-810-4923 or email (dannie.mckee@gmail.com). My office hours are posted on the "News" page. Don't hesitate to ask for help; your success is my success!
I’m pleased to have you in Web Design 1. Let’s talk about what you should do every day when you come to class
I’m pleased to have you in Web Design 1. Let’s talk about what you should do every day when you come to class
- If your Pager is sounding OR the green light is on, click on the pager and read your messages.
- Check your class and personal email. Respond to each of them in a professional manner.
- Read my comments on your discussions, the dropbox, and quizzes.
- Review your lessons for the week. (The class calendar for the first 9 weeks is on the Course Home Page.)
- Next, start reading your lessons from the Content tab and completing the assignments. They are due each Monday before 8 pm central time. (Zeros will be posted for all incomplete work.)
Miscellaneous Notes
It’s very important that you stay on track. There is almost no way you can complete the course if you fall behind. The class is over in only 18 weeks. So you have to work hard every day in class. I expect you to stay focused and complete the material as assigned. It’s really hard to skip around the course. The sequence listed is the sequence you should follow. . I also check your discussions, email and dropbox feedback to see that it's current. And don’t take tests before your read the Content and complete your lessonsThat’s setting yourself up to fail! And I want you to have a great grade in the class.
It’s very important that you stay on track. There is almost no way you can complete the course if you fall behind. The class is over in only 18 weeks. So you have to work hard every day in class. I expect you to stay focused and complete the material as assigned. It’s really hard to skip around the course. The sequence listed is the sequence you should follow. . I also check your discussions, email and dropbox feedback to see that it's current. And don’t take tests before your read the Content and complete your lessonsThat’s setting yourself up to fail! And I want you to have a great grade in the class.
I can and do watch your work and course page. And remember I am watching those posts because I want you to learn business communicating skills. I can also see how much time you spend on the content portion of your lessons. I KNOW you have to spend several minutes reading each lesson carefully before you ever turn in your work. So in the future, I expect to see positive progress.
What’s the pay-off? You learn to stay organized, set goals, and interact online in a professional way. AND you can earn ½ credit for successfully completing Keyboarding.
SO, it's time for you to get started. Go to our Class Page and start Keyboarding!
SO, it's time for you to get started. Go to our Class Page and start Keyboarding!
HOW TO: Install MicroType 4.2 and Create Folders
To get started with the MicroType 4.2 software, read through all these instructions first. Print this Guide OR Keep the file open and switch between this Guide and your MicroType 4.2 Installation Screen. Next open your MicroType 4 QuickStart Guide to page 9. Then follow these steps.
INSTALL MICROTYPE 4.2 According to QuickStart Guide Page 9
- Create a Sytem Restore Point BEFORE you install MicroType 4.2.
- Review system requirements for Single User / Site Workstation on Page 8 of MicroType 4.2 Quick Start Guide.
- Follow Section 3 Installation Procedures for Single User on Page 9 of Quick Start Guide.
- Install all the software, including the movies, if your system has adequate space.
- DO NOT CHECK DISTANCE LEARNING OPTION WHEN ASKED.
- DO NOT INSTALL ANY TEXTBOOKS.
- Restart your computer after you install the software.
CREATE AN ACCOUNT
After MicroType 4.2 is installed, you must create an account. Here are the steps to create your account. (You may also view these steps on pp 21 and 22 of the MicroType 4.2 Quick Start Guide.)
Locate and Click on the MicroType 4 Icon on your Desktop.

Click on the Thomson-Southwest Icon

Create a New User

Create Your Account (Your Last Name, Your First Name, Password (school)


Main Screen. Now your software is ready. Take a minute to look at the different topics available. And when you sign in to your account, always turn on your speakers. There are short introductions to each module.

OTHER NOTES:
- This software is compatible with Windows XP, Vista, and Windows 7.
- If someone else has access to your computer and wants to learn to type, have them sign in as "Guest" so their files are not included in yours.
- After you complete EACH lesson, take a screen shot of your completed work. (Press the print screen key--you may have to press FN+Print Screen, depending upon your keyboard layout. Nothing will happen when you press Print Screen.)
- Create a new MS Word Document.
- Change the page orientation (layout) to Landscape.
- Paste the screen shot on the page. (Ctrl+V) OR (Edit, paste)
- Save your work as xxdropbox (replace xx with your initials and replace dropbox with the dropbox number.) Example dm1_02 (File names cannot contain periods or certain other special characters.)
- Upload your MSWord document to the correct dropbox.
- Back up your work on your Thumbdrive on a daily basis.
To make a folder on your hard drive.
Right-click on the Start button, select "Explore" from the pop-up menu.
Notice the window has two parts: left and right.
Click once on the C: drive (shown on the left side of window).
Move your mouse (do not hold down a button) over to the white area of the right panel.
Right mouse-click in white area
Now, click "New," "Folder."
Type XXKeyboarding, which is the name of the folder--replace XX with your initials. (Be sure not to hit any other buttons—just type the name.) You can also right click on the folder and name it.
Hit Enter once.
To create a folder inside of another folder.
- Double-click the Keyboarding folder.
- Right mouse-click in the white area in right panel of window.
- Click "New," "Folder."
- Type the name of the folder. (Be sure not to hit any other buttons—just type the name.)
- Hit Enter once.
- Repeat as necessary to create the following folders inside the XXKeyboarding folder:
- Lessons
- Class Notes
- Letters
- Emails
- Reports
Use these folders to keep your work organized. You need to spend time keyboarding--not searching for lost files!
Subscribe to:
Posts (Atom)