To get started with the MicroType 4.2 software, read through all these instructions first. Print this Guide OR Keep the file open and switch between this Guide and your MicroType 4.2 Installation Screen. Next open your MicroType 4 QuickStart Guide to page 9. Then follow these steps.
INSTALL MICROTYPE 4.2 According to QuickStart Guide Page 9
- Create a Sytem Restore Point BEFORE you install MicroType 4.2.
- Review system requirements for Single User / Site Workstation on Page 8 of MicroType 4.2 Quick Start Guide.
- Follow Section 3 Installation Procedures for Single User on Page 9 of Quick Start Guide.
- Install all the software, including the movies, if your system has adequate space.
- DO NOT CHECK DISTANCE LEARNING OPTION WHEN ASKED.
- DO NOT INSTALL ANY TEXTBOOKS.
- Restart your computer after you install the software.
CREATE AN ACCOUNT
After MicroType 4.2 is installed, you must create an account. Here are the steps to create your account. (You may also view these steps on pp 21 and 22 of the MicroType 4.2 Quick Start Guide.)
Locate and Click on the MicroType 4 Icon on your Desktop.
Click on the Thomson-Southwest Icon
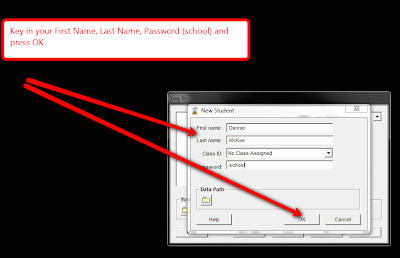
Create Your Account (Your Last Name, Your First Name, Password (school)

Main Screen. Now your software is ready. Take a minute to look at the different topics available. And when you sign in to your account, always turn on your speakers. There are short introductions to each module.
OTHER NOTES:
- This software is compatible with Windows XP, Vista, and Windows 7.
- If someone else has access to your computer and wants to learn to type, have them sign in as "Guest" so their files are not included in yours.
- After you complete EACH lesson, take a screen shot of your completed work. (Press the print screen key--you may have to press FN+Print Screen, depending upon your keyboard layout. Nothing will happen when you press Print Screen.)
- Create a new MS Word Document.
- Change the page orientation (layout) to Landscape.
- Paste the screen shot on the page. (Ctrl+V) OR (Edit, paste)
- Save your work as xxdropbox (replace xx with your initials and replace dropbox with the dropbox number.) Example dm1_02 (File names cannot contain periods or certain other special characters.)
- Upload your MSWord document to the correct dropbox.
- Back up your work on your Thumbdrive on a daily basis.
To make a folder on your hard drive.
Right-click on the Start button, select "Explore" from the pop-up menu.
Notice the window has two parts: left and right.
Click once on the C: drive (shown on the left side of window).
Move your mouse (do not hold down a button) over to the white area of the right panel.
Right mouse-click in white area
Now, click "New," "Folder."
Type XXKeyboarding, which is the name of the folder--replace XX with your initials. (Be sure not to hit any other buttons—just type the name.) You can also right click on the folder and name it.
Hit Enter once.
To create a folder inside of another folder.
- Double-click the Keyboarding folder.
- Right mouse-click in the white area in right panel of window.
- Click "New," "Folder."
- Type the name of the folder. (Be sure not to hit any other buttons—just type the name.)
- Hit Enter once.
- Repeat as necessary to create the following folders inside the XXKeyboarding folder:
- Lessons
- Class Notes
- Letters
- Emails
- Reports
Use these folders to keep your work organized. You need to spend time keyboarding--not searching for lost files!


Software Installed! Folders are set up!
ReplyDeleteCongratulations, Jackie! You just earned 15 BONUS points! And you are well on your way to that diploma.
ReplyDeleteI believe that i might like this class!
ReplyDeleteHello Mrs. McKee. I am very exited about this class. I hope to learn to keyboard faster and more accurately. I have not recieved my software yet, but I do have a folder set up.
ReplyDelete-Levi Smith-
Levi, your software should arrive at your house by Saturday according to the MVPS contact in Jackson. Thanks for getting those folders set up.
ReplyDeleteAnonymous: I need your name on your comments; otherwise I can't give you those BONUS POINTS!
ReplyDeleteOkay, all set up. Thanks for the help.
ReplyDelete1.9.10 Great, John. Hope you enjoy your Windows 7 computer. I find it fairly easy to navigate. I suggest you add Google Chrome as your browser. It works great on MVPS and seems to load everything so much faster than Internet Explorer.
ReplyDeleteeverything is set up
ReplyDelete1.9.10 Thanks, BreAna, for getting that set up. Just remember to complete your MVPS orientation assignments before Monday.
ReplyDeleteall of it is almost done, i belive i have one last thing to do.
ReplyDelete1.9.10 Great, Nana. Let me know if you need any help on completing the work. Enjoy the class!
ReplyDeleteI still do not have my software but i will catch up as soon as I do
ReplyDeleteJackie, thanks for getting those folders organized!
ReplyDeleteKashia Gray: Yay!!!...i just got my folder set up. i am so excited about this i hope i learn some new things it seems like it going to be very fun and interesting.
ReplyDeleteKashia, you are really a dedicated young lady. Thanks for getting those folders set up. And don't forget to back up your work on a "Thumb Drive"! My computer crashed is not a good excuse!
ReplyDelete